How to Get Your Free Equifax Credit Report Online in India

Most people in India are familiar with CIBIL, but very few actively check their Equifax credit report. That’s a mistake.
Equifax is one of India’s four authorized credit bureaus, and banks do use Equifax data for loan approvals, especially for unsecured loans like personal loans, credit cards, and BNPL products. If there’s an error in your Equifax report and you never check it, you won’t even know why your application was rejected.
The good news is this: Equifax allows you to generate one free credit report every year, directly from their official website. No agent. No payment. No shortcuts.
This guide explains the exact process, exactly the way you’ll see it on your screen—from registration to downloading the report. We’ll also explain what happens if you’re already registered and how to avoid common mistakes during signup.
Why You Should Check Your Equifax Credit Report
Your credit profile is not stored in one place. Banks and NBFCs may pull data from different bureaus depending on their internal policies.
- Checking your Equifax report helps you:
- Catch errors that may not appear in your CIBIL report
- Understand how lenders see your repayment behavior
- Track enquiries made by lenders
- Ensure your personal details are accurate
- Protect yourself from identity-related credit issues
If you want to access all four bureau reports in one place, you can also use this internal resource on CreditReveals: 👉 Free Report
That page links directly to free report options from all authorized bureaus.
Step 1 — Visit the Official Equifax India Website
Go to the official website of Equifax: https://www.equifax.co.in/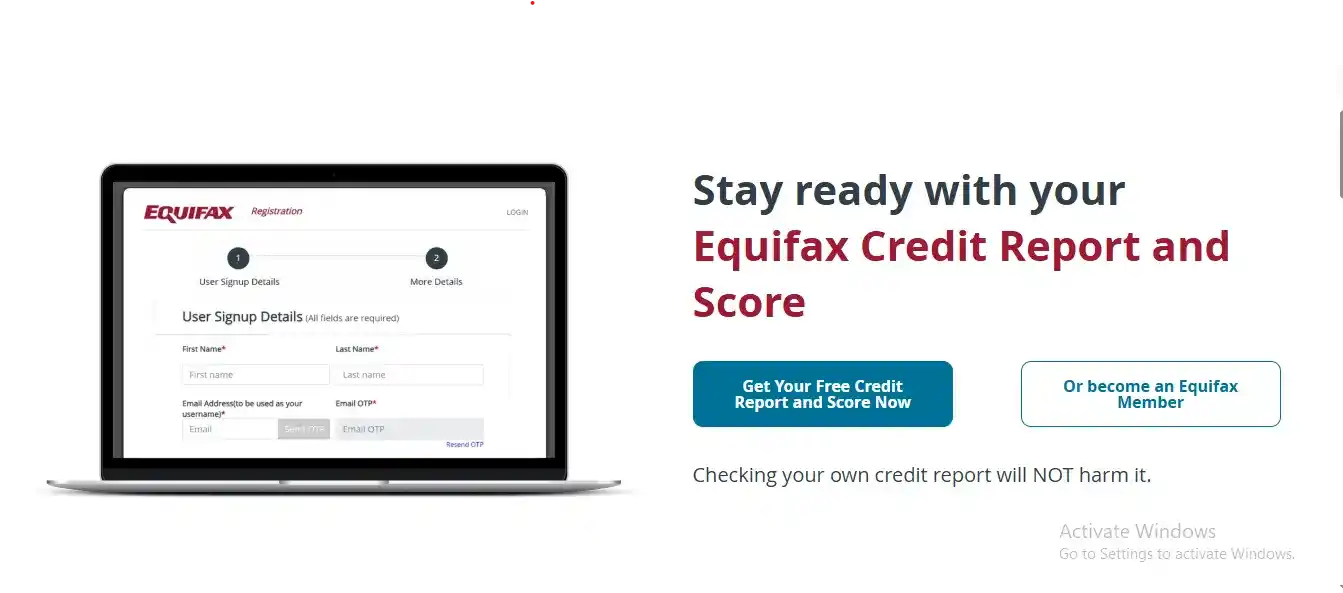
Scroll down slightly on the homepage. You’ll see a button that says:
“Get Your Free Credit Report and Score Now”
Click on this button.
Step 2 — Open the Free Credit Report Portal
A new tab will open that looks different from the main Equifax site. This is Equifax’s consumer portal.
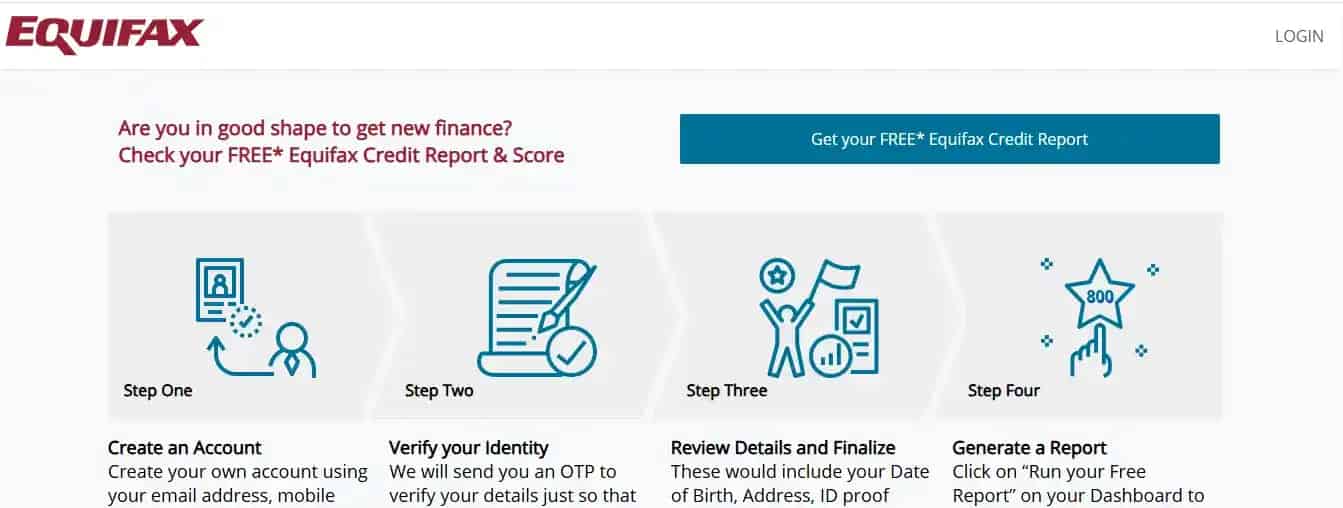
On this page, click the button:
“Get your FREE Equifax Credit Report”*
You will now be taken to the registration page.
Step 3 — Fill in User Signup Details (Registration)
This page is titled User Signup Details. Every field here matters, and mistakes made at this stage are hard to fix later. So slow down and double-check everything.
- You’ll be asked to enter:
- First Name
- Last Name
- Mobile Number
- Email Address (this becomes your username)
After entering your email address, click Send OTP.
OTP Verification
An OTP will be sent to your email address (and sometimes to your mobile number as well). Enter the Email OTP in the given field. If needed, you can use Resend OTP.
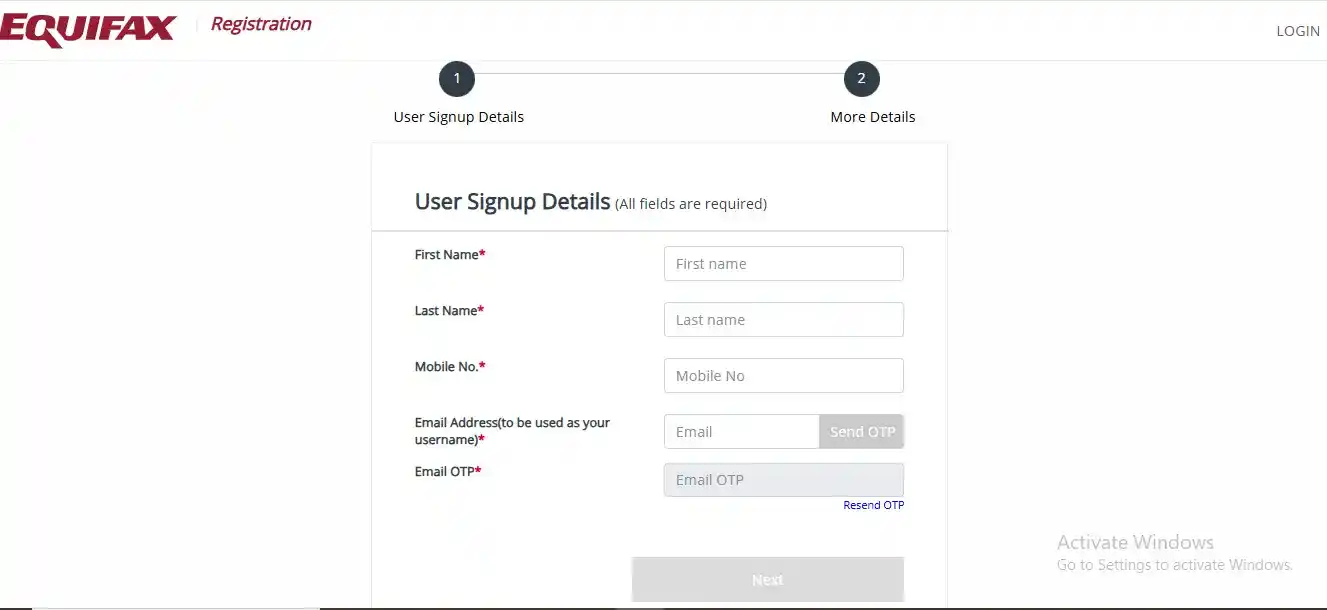
Once OTP verification is complete, click Next.
Step 4 — Enter More Personal Details Carefully
Now you’re on the More Details page. This is where Equifax verifies your identity against lender records.
You’ll need to provide:
- New Password and Confirm Password
- Date of Birth (DD-MM-YYYY format)
- Gender
- Complete Address
- City and State
- PIN Code
- ID Type (PAN is most commonly used)
- ID Number
At the bottom, you must:
Accept the Terms and Conditions
Tick the “I am not a robot” checkbox
Then click Next.
⚠️ Important:
Details entered here should exactly match what your bank or lender has on record. Even a small mismatch (like address spelling or DOB format) can cause issues later.
Step 5 — Registration Complete and Login
If everything is submitted correctly, you’ll see a confirmation message:
“Congratulations! Your registration is completed.”
Click the Login button.
Now log in using:
- Your email ID (username)
- The password you just created
You may again receive an email OTP for verification. Enter it, confirm, and continue.
Once verified, you’ll land on the Equifax dashboard.
Step 6 — Run Your Free Equifax Credit Report
On the dashboard, look for a section or card labeled:
Consumer Credit Report
Inside this section, click:
“RUN A FREE REPORT”
You’ll be taken to a page titled My Credit Reports.
Here, click the button:
“RUN YOUR FIRST FREE CREDIT REPORT”
A confirmation popup will appear saying that you’re about to generate a free report. Confirm and proceed.
Step 7 — Report Generation and Download
Your report will be generated within seconds.
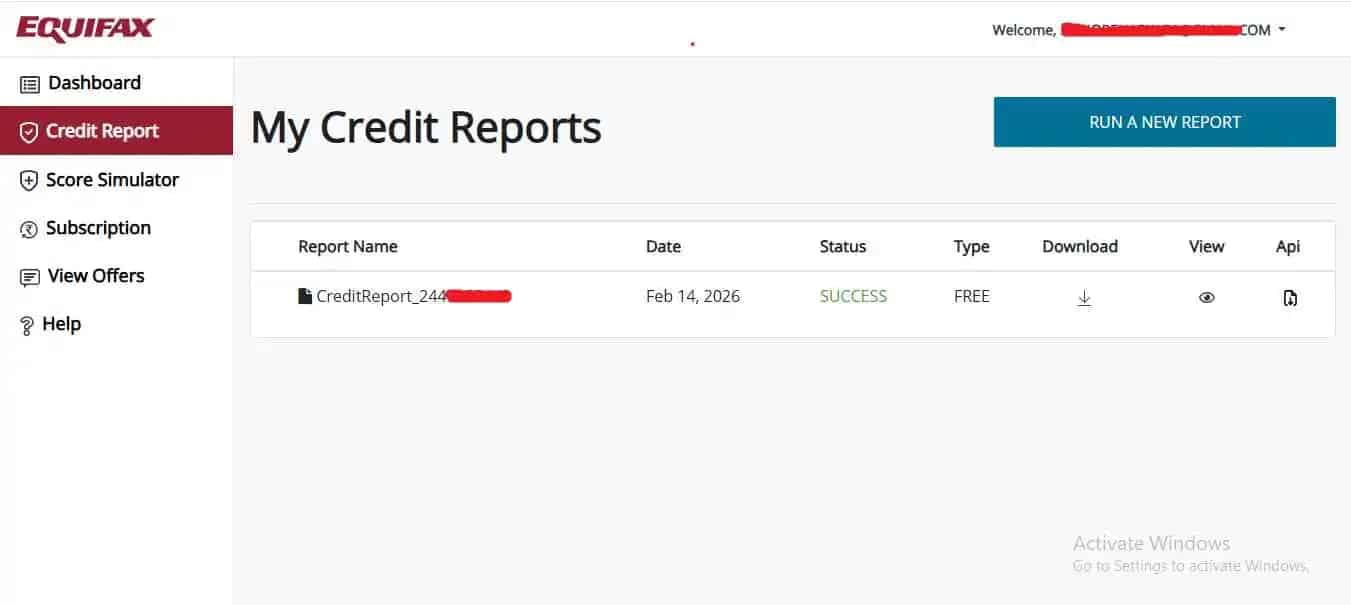
You’ll now see a table with details like:
- Report Name
- Date
- Status (SUCCESS)
- Type (FREE)
- Download icon
Click the download icon next to your report.
That’s it. Your Equifax credit report PDF will be downloaded to your device.
No print tricks. No browser workarounds. Direct download.
If You Are Already Registered
If you’ve used Equifax earlier, do not register again.
Simply:
- Go to the Equifax login page
- Enter your registered email and password
- Verify OTP (if prompted)
- Go to the dashboard
- Click RUN A FREE REPORT (if eligible for the yearly free report)
If your free quota is already used for the year, the system will clearly show that.
Things to Keep in Mind While Using Equifax
A few practical points most guides don’t mention:
- You get one free Equifax report per year
- Registration details are difficult to change later
- Always use your own email and phone number
- Do not create multiple accounts with different emails
- Download and save the PDF for future reference
If your report shows incorrect data, Equifax also provides a dispute mechanism through the dashboard.
Final Thoughts
Checking your Equifax credit report is not optional anymore—it’s part of basic financial hygiene.
Many people only focus on CIBIL and ignore the other bureaus. But lenders don’t. A clean Equifax report can strengthen your profile, while an unnoticed error can quietly hurt your chances.
Since Equifax offers this report for free, there’s really no reason to skip it.
And if you want a single page that links you to all four free credit bureaus in India, bookmark this internal resource on CreditReveals: 👉 Free Credit Report
It saves time and helps you stay fully informed.
Once you understand how this process works, you can confidently check your report every year—and fix problems before they affect your applications.
0 Comments

No comments yet. Be the first to share your thoughts!